This chapter contains the following topics:
Use this selection to enter receivings and post them to the permanent Purchase Order data (and, if you are interfaced to Inventory Control, to I/C Transactions). You can enter receivings for a purchase order, or enter receivings that come in for which there is no purchase order.
Receivings does not directly update the permanent A/P data. What it does do is make account or job distributions available to A/P upon subsequent entry of the vendor’s invoice. This happens in the Payables (Enter) selection when you enter the numbers of the purchase order (if there was one) and of the receiving.
Passport assumes that you manually record your receivings on some form of receiving document, referred to here as a receiver. Each receiver should have a unique number. If you interface to I/C, this number is used by I/C as the transaction number.
A receiving for which there is no purchase order lacks the distributions to G/L accounts (or to jobs). No provision is made for entering this information in Receivings, since it is not assumed that the operator who enters the receivings is the same person who writes the purchase orders. The distribution has to be supplied within A/P Payables.
If you are using Inventory Control, this selection is an important part of the Purchase Order to Inventory Control interface. When receivings are posted here for line-items described in the purchase order as This P.O. line is for Inventory, the posting process creates receiving-type inventory transactions in I/C, just as if you had entered them directly through I/C and posts them to your permanent Inventory data.
Select
Enter from the Receivings menu.
The following screen appears:
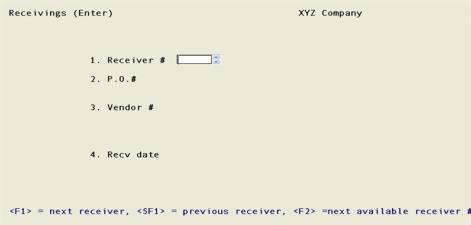
New and existing receivings
From this screen you can work with both new and existing receivings. If a receiving has already been entered for the receiver number you specify, it appears and the cursor is positioned at Field number to change ? for changes or deletion.
1. Receiver #
Enter the number of the receiver (receiving document) for this receiving.
Options
You may also use one of the options:
|
<F1> |
For the next receiving |
|
<SF1> |
For the previous receiving |
|
<F2> |
For the next available receiver number from Control information |
|
Format |
999999 |
|
Example |
Press <F2> |
Receiver numbers
P/O keeps strict control over your receiver numbers, so that there are never any that are unaccounted for.
You may have some legitimate reason for not using a receiver number; for example, a pre-printed form may have been accidentally destroyed. In that case you can void the number. Field #2 below, P.O. #, describes how to void a receiver number.
Unless every receiver number has either been entered or voided, you will not be able to post your receiving transactions if there are any gaps in the sequence of receiver numbers.
If you delete a receiver, you must still account for that receiver number either by reusing it for a different receiving, or by voiding it.
P/O allows up to 999999 receiver numbers. If you use them all up, be aware that the system does not automatically wrap around from 999999 to 1. You have to do this yourself (by setting the last posted receiver number to zero in Control information).
2. P.O. #
Enter the purchase order number for this receiving, if there is one. The purchase order must previously have been entered and posted (in Purchase orders), and must not yet have been purged. No unposted Change purchase order entry may exist for the purchase order.
Normally you enter the number of an open purchase order, but it is recognized that a vendor may erroneously deliver goods, and you may choose to accept them, on a purchase order which you had already closed. When this happens, you are asked if you wish to continue; if you respond Y, the delivery is accepted.
Options
You may also use one of the options:
|
Blank |
To indicate that there was no purchase order for this receiver |
|
<F2> |
To void this receiver number. This option is only available if there is no receiving with this number. |
Upon selection of a valid purchase order number:
| • | Purchase order date and deliver-to location display in Field #2. |
| • | Vendor number, name, and address display in Field #3. |
| • | If this is a blanket purchase order, “BLANKET ORDER” appear below the purchase order number. |
Upon entry of Blank for purchase order number:
| • | “NO P.O. FOR THIS RECEIVER” appears in lieu of a purchase order number. |
| • | Fields #2 and #3 remain blank until you fill them in. |
|
Format |
15 characters |
|
Example |
Type: 15 |
3. Vendor #
If a purchase order number was entered, this field automatically displays and the cursor does not move to it.
Otherwise, enter the number of the vendor from whom the goods were received. The vendor must be in Accounts Payable Vendors, unless this is a temporary vendor.
|
Format |
Six characters |
|
Example |
In this example vendor displays automatically. |
Upon entry of a valid vendor number, the vendor’s name and address display automatically.
|
Format |
Six characters |
|
Example |
In this example, vendor number displays automatically. |
Temporary vendors
Any vendor number beginning with an asterisk is assumed to be a temporary vendor. The vendor number may be, but need not be, present as an entry in A/P Vendors. For a temporary vendor, enter the vendor name. This field is required.
|
Format |
25 characters |
|
Example |
In this example, vendor name displays automatically. |
4. Recv date
If a purchase order is present, it is not required that the actual receiving date agree with the scheduled date on the purchase order. The system applies the receiving to the next scheduled open delivery for each line item.
Enter the date of the receiving, or press <F1> for the System date.
|
Format |
MMDDYY |
|
Example |
Press <Enter> |
5. Deliver to
This field only appears when you have entered a purchase order number for a multi-drop purchase order. If several deliveries of the same item are scheduled at different locations on the same date, this field serves to distinguish amongst them.
Recall that each receiving applies to a single deliver-to location; so a separate receiving is required for each location. You cannot use this field to receive goods at one location which were ordered for a different location.
If I/C is interfaced
If you have specified (in I/C Control information) that you use multi-warehousing, the deliver-to location must be a valid warehouse.
Otherwise, you must enter Blank (for Central).
Enter the code for the deliver-to location for this receiver, or use one of the options:
|
Blank |
For the Central deliver-to location (if one has been defined) |
|
<F1> |
For the deliver-to location entered for the purchase order header (unless that is Central, in which case this option is not available) |
|
Format |
Two characters |
|
Example |
Does not appear in this example, as this is not a multi-drop purchase order. |
Field number to change ?
Make any needed changes. Upon pressing <Enter> with this field blank:
| • | If this is a new receiving, the line item screen appears. |
| • | If this is an existing receiving, you are then asked if you want to change the lines for this receiver. If you answer Y, enter the number of the line you want to change (or delete), and the line item screen appears. |
Options
If you answer N, you may use one of the options:
|
<F1> |
To display each line in turn |
|
<F3> |
To delete this receiving. If you delete an entire receiver, before you are allowed to post receiving transactions you have to either reuse that receiver number or mark that number as void. |
The receiver line screen is shown below:

There is considerable variation in the appearance of this screen, depending on whether:
| • | A purchase order had previously been entered for this receiving |
| • | This is a regular vendor or a temporary vendor |
| • | This is an inventory item or a non-inventory item |
| • | You are interfaced to I/C (and if so, whether you use multi-warehousing. |
| • | If one or more receivings were previously posted for the purchase order, then additional fields will display and an additional option is provided. These are described below. |
Rather than provide separate screen layouts and explanations for all possible combinations, the variations are dealt with as they occur.
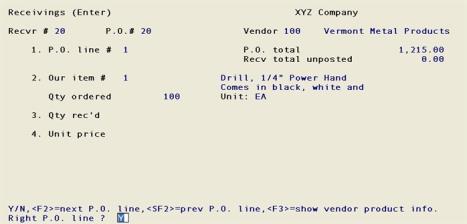
1. P.O. line # or Recv line #
If a purchase order exists for this receiving, the caption for this field is P.O. line # and your entry in this field refers to the line numbers on the purchase order - not to the sequence numbers which you originally assigned to these lines (usually in increments of ten). These have since been superseded by sequential line numbers, counting from one by ones.
If no purchase order exists, the caption for this field is Recv line #, which refers to the sequence of lines on the receiver (also counting by ones).
These two captions will switch back and forth if you alternate using the <F1> and <F2> options (and their <Shift> variants).
Normally you select an open line item, but it is recognized that a vendor may erroneously deliver goods after you have closed the line item. When this happens, you are asked if you wish to continue. If you respond Y, the delivery will be accepted.
Enter a valid line number for the document concerned.
Options
You may also use one of these options if the P.O. exists:
|
<F1> |
For the next receiving line item |
|
<F2> |
For the next P.O. line item (See screen below) |
|
<SF1> |
For the previous line item of the purchase order |
|
<F6> |
For viewing the receivings history for the purchase order. This option only displays if you have done a previous receiving for the purchase order. |
After selecting an P.O. line a screen similar to this appears:
At the Right P.O line ? prompt, type N to return to P.O. Line # field if it is the incorrect P.O..
If it is the correct P.O. line, type Y to continue.
Options
You may select one of the following options:
|
<F2> |
For the next line item of this receiving. |
|
<SF2> |
For the previous P.O. line item. |
|
<Esc> |
To terminate entering line items for this receiving. |
If no P.O. exists you have these options:
|
<F1> |
For the next receiving line item |
|
<SF1> |
For the previous receivings line item |
|
<F2> |
For the next P.O. line item |
|
<Esc> |
To terminate entering line items for this receiving. |
Pressing <Esc> terminates the receiving, but before doing so the software allows you to enter the miscellaneous charges if you have specified that these are applied to the order as a whole.
|
Format |
999 |
|
Example |
Press <F2> |
Upon selection of a line, either by entry of a line number or by use of the option keys, you are asked Right P.O. line ? or Right receivings line ?, as the case may be. In addition to the usual Y and N response, and the option of continuing the scan, you may use the option:
|
<F3> |
Display vendor product info |
This information, consisting of the vendor item number, description, and unit is helpful in locating where this receiving should apply. The option is provided in this field (rather than at Field #2) because the cursor is not normally positioned in Field #2 at all.
P.O. total
This field is a display of the total amount of the Purchase order. This number cannot be changed.
Recv total unposted
This field will update as you enter quantity and unit price of the receiver lines for the purchase order.
Recv total posted
This display-only field will only appear if you previously entered and posted receivers for the Purchase order. This is the amount of the previously posted receivers.
Qty ordered
This display-only field displays the quantity entered on the purchase order.
Qty posted
This display-only field will appear if you previously entered and posted receivers for the selected Purchase order line. This is the item quantity of the previously posted receivers for the selected line.
Is this item for inventory ?
This question appears only if no purchase order exists for the receiving and you are interfaced to I/C.
Answer Y if you wish this receiving to be added to your inventory. You will be required to supply a valid I/C item number in Field #2. Answering Y here is the equivalent of having entered This P.O. line is for Inventory on the purchase order if there had been one.
Answer N if you do not wish this receiving to be added to your inventory - whether or not a valid item number exists for this item. You will merely be required to supply a vendor product number, which does not even have to be in Vendor items. Answering N here is the equivalent of having entered This P.O. line is for Job or This P.O. line is for Other on the purchase order if there had been one.
Whether you enter Y or N here, you can reference this receiving from the A/P Payables selection when you subsequently enter the vendor’s invoice. You can also enter the account number distribution (and job distribution, if applicable) at that time.
|
Format |
One letter, either Y or N |
|
Example |
Does not appear in this example because a purchase order exists for this receiving. |
Deliver-to
This field appears only if no purchase order exists for the receiving and you have answered Y to the preceding.
If you have specified in I/C Control information that you do not use multi-warehousing, you do not have a choice of locations and must enter either Blank or <F1>
Enter the location code for the location to which the items are to be delivered. This may be Blank for Central if that location has been defined.
For every location except Central, the name of the location displays to the right of its number.
For the Central location (if one is defined), its name displays instead of a number.
|
Format |
Two characters |
|
Example |
Does not appear in this example because a purchase order exists for this receiving. |
2. Our item # or Vndr prod #
Except when no purchase order exists for this receiving, this field displays automatically.
The item is identified either by your own item number or the vendor’s product number. The former is the case if you are interfaced to I/C and this is neither a non-inventory item nor a temporary vendor; the latter is the case otherwise. If both are available you can view both by toggling <F3> from the Right line ? question in the previous field.
| • | When the item number displays, the first two lines of the item’s description (from I/C Items) also display. |
| • | When the vendor product number displays, the vendor’s description (from P/O Vendor items) also displays. |
| • | In either event, the selling and shipping units from Vendor items display at the right of the line. |
<F3> does not affect the use of this line item, which was established when the purchase order was entered. Consider for instance a line item whose use was declared to be I (for Inventory). Even if you use <F3> to search for this line item by its vendor product number (because that is what appears on the vendor’s document), this fact does not change the item’s use to O (for Other).
If no purchase order exists for this receiving, enter the following information:
|
Format |
15 characters |
|
Example |
Does not appear in this example because a purchase order exists for this receiving. |
Vendor product description
If no purchase order exists for the receiving and you are either not interfaced to I/C or have specified a non-inventory item, enter a description of the item.
|
Format |
Two lines of 25 characters |
|
Example |
Does not appear in this example because a purchase order exists for this receiving. |
Selling unit
This field appears after you enter the vendor product number if no purchase order exists for the receiving and you are either not interfaced to I/C or have specified a non-inventory item. Enter the vendor’s selling unit.
|
Format |
Four characters |
|
Example |
Does not appear in this example because a purchase order exists for this receiving. |
3. Qty rec’d
Enter the quantity received. The software expects to receive the entire quantity open, and warns you if you enter a lesser or greater amount.
If you enter a lesser amount, the question Should this delivery be left open ? appears. Enter Y if you want to leave the balance of the delivery open or N to close it. When a delivery line is left open, you may receive additional items for the line at a later time on the same receiving (if not posted) or a new receiving.
If you enter an amount greater than the quantity ordered, then This is in excess of 999999. Is this correct ? will display. Select Y to receive the amount entered or enter N to re-enter the quantity.
You may select the unit of measure.
Options
You may also use the option:
|
<F2> |
To toggle among three units of measure your stocking unit, the vendor’s selling unit, and the vendor’s shipping unit. The initial default is your stocking unit. |
If you are not interfaced to I/C, only the vendor’s units are available. If any of the units of measure are the same, you have fewer than three choices. If all are the same, you have no choice and the option does not appear.
If the item is serialized, a fractional quantity is not be accepted.
|
Format |
99999999.99999 (if this line is for Inventory or Other) |
|
|
99999999.9 (if this line is for Jobs) |
|
Example |
Type: 2 |
Single-drop and multi-drop purchase orders
Each line on a purchase order has its own delivery schedule. All receivings are applied to the deliveries on this schedule.
| • | If the quantity received exactly matches the first delivery that is open (at this location, if multi-drop), then that quantity will be applied automatically to that delivery (whether or not the receiving date matches the scheduled delivery date). If the first open delivery has already been partially received (by an earlier receiving), the match is to the quantity remaining open, not to the quantity originally specified for that scheduled delivery. |
| • | If the quantity received is less than the open delivery quantity, you are asked whether the delivery should be left open or closed out short. If you choose to close the delivery, no future receivings can be applied to that particular delivery. |
| • | If the quantity received is greater than the current open delivery, and the delivery schedule contains more than one open delivery at this warehouse, the entire delivery schedule appears at the bottom of the screen. |
The cursor moves down the Qty-to-apply column to let you distribute the excess quantity received. You can apply the excess to one or more deliveries, but you must satisfy one entry before moving to the next. If the last entry is not satisfied you can close it or not, as you choose. (An entry is satisfied if the amount you distribute now, plus any amount received on previous receivings, is at least equal to the quantity originally scheduled).
Qty-to-apply
Enter the quantity to apply to this scheduled delivery.
For a serialized item, you may not enter a fractional quantity.
|
Format |
99999999.99999 (if this line is for Inventory or Other) |
|
|
99999999.9 (if this line is for Jobs) |
|
Example |
Does not occur in this example because the quantity is not excessive. |
Cls?
This field is automatically set to Y if the quantity ordered for this delivery has been satisfied and the quantity remaining to distribute has not yet reached zero.
If the quantity ordered for the delivery is not satisfied and the quantity remaining has reached zero, enter Y to indicate the scheduled delivery is closed (future receivings may not apply to it); otherwise enter N.
|
Format |
One letter, either Y or N. |
|
Example |
Does not occur in this example because the quantity is not excessive. |
<Esc> = re-apply <Enter> = continue
This field is reached automatically as soon as one of two things happens:
| • | The quantity remaining to apply reaches zero. |
| • | The quantity remaining is greater than required to satisfy the last scheduled delivery. Whatever remains is automatically assigned to that delivery, which is then closed. |
Either way, you are asked to confirm your distribution. Press <Esc> to reenter the information, or <Enter> to accept it and return to the full screen.
Blanket orders
On a blanket order, it is expected that the total received for a line item (the current receiving plus all previous receivings, including both posted and unposted ones) will equal the total quantity released to date. You can accept delivery of a greater or lesser quantity, but you will be informed in either case. If you accept a greater quantity than has been released to date, upon posting this receiving the quantity released to date will be forced equal to the quantity received to date.
4. Unit price
Options
Enter the unit price for the item or you may also use the option:
|
<F1> |
To change the unit of measure. |
|
<F2> |
For the price entered on the purchase order. |
|
Format |
9999999.99999 |
|
Example |
10 |
Field number to change ?
If this is an existing line item, you may press <F3> to delete this receiving line.
Make any desired changes. When you are done making changes and press <Enter>, the following will occur in the sequence given:
| • | If this is an inventory item (whether or not there is a purchase order for this receiving), and if the item is serialized and this line item is a new entry, the serialization screen will be displayed automatically and you will not be able to exit the process until all units are serialized. (If you force exit by pressing <Esc>, the quantity received will be set equal to the number of units serialized.) |
If the item is serialized, and this line item is an existing entry, then serialization is required if you have changed the quantity.
When you delete a line item, all serial numbers assigned to that item are automatically unassigned (you do not have to individually remove each serial number).
| • | The screen clears to enter the next receiving line. |
| • | As you finish with each line item, a summary of that line item displays in the lower half of the screen. Existing entries scroll down. This portion of the screen displays the four most recent entries you have made for this receiving. |
Upon pressing <Enter> with this field blank, there is a period of processing while the total costs are converted to unit costs and are pro-rated to the individual line items of the receiver according to their respective product costs. You are returned to the header screen to enter the next receiving.
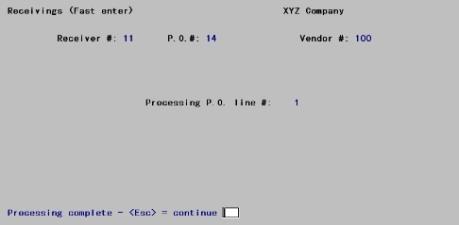
Use this function to enter an entire receiving at once, instead of line-by-line as in Enter.
This function works best when all items ordered are delivered as expected. As expected means:
| • | For a single-drop purchase order, all open line items are received in the quantity expected. |
| • | For a multi-drop purchase order, all open line items for this location are received. |
| • | For a blanket order, all open line items in the current release are received. |
Fast entry accepts without question the quantities and costs on the purchase order, including the miscellaneous costs. If there has been no purchase order for this receiving, you cannot use Fast entry.
There is no change mode for the Fast entry selection. However, a receiving entered via Fast entry may be changed or deleted later via Enter. Receivings must be posted after entry, whether entered via Enter or Fast enter.
The following restrictions apply. If an attempted use of Fast entry would violate any of these, you will be informed of the fact. When this happens, simply use Enter instead of Fast enter.
| • | The purchase order entered here must be an open and uncanceled purchase order. |
| • | It may not have any unposted changes pending. |
| • | Serialized items may not be serialized at time of receipt. |
| • | A single-drop purchase order may not have any receivings (posted or unposted). |
| • | A multi-drop purchase order may not have any receivings (posted or unposted) for the deliver-to location of this receiving. |
| • | A blanket purchase order may not have any unposted releases pending, nor any receivings (posted or unposted). |
Select
Fast enter from the Receivings menu.
The following screen appears:
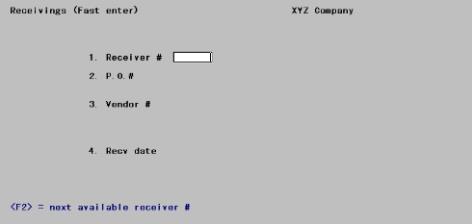
Enter the following:
1. Receiver #
Enter a receiver number, or press <F2> for the next available receiver number from Control information.
|
Format |
999 |
|
Example |
Press <F2> |
2. P.O.#
Enter the number of a posted purchase order.
|
Format |
15 characters |
|
Example |
Type: 16 |
3. Vendor #
This field displays the vendor number, name, and address for your information. It cannot be changed.
4. Recv date
Enter the date of the receiving.
|
Format |
MMDDYY The default is the System date. |
|
Example |
Press <Enter> to accept the default. |
5. Deliver to
This field only appears for a multi-drop purchase order.
Enter the deliver-to location for this receiving, which must be a valid entry in Deliver-to locations. This can be Blank (for Central), provided this has been defined. If you are interfaced to I/C and have chosen in I/C Control information not to use multi-warehousing, your only valid entry is Blank.
|
Format |
Two characters |
|
Example |
Does not appear in this example because this is not a multi-drop shipment. |
Upon entry of a valid location, its name and address display to the right of its number.
Field number to change ?
When you press <Enter> after making all desired changes, the following screen appears:
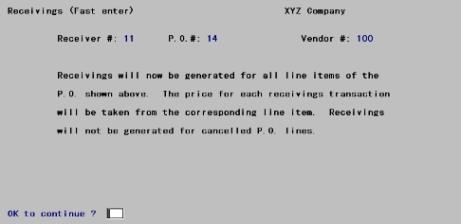
Enter Y to begin verifying the purchase order lines for this receiving.
If this receiving cannot be processed, you will be informed. The possible reasons for this are listed at the beginning of this section.
Otherwise, the following screen appears while the receiving is generated for this purchase order.
This selection prints a list of all receivings currently entered but not yet posted, for your review. It is good practice to review the receivings before posting.
If there is a gap (unused numbers) in the receiver number sequence, an error message prints on the edit list. Posting cannot take place. You can fix this situation by either entering the missing receivers or voiding the missing receiver numbers through the Enter option of this selection.
See a sample Receivings Edit List in the Sample Reports appendix.
Select
Edit list from the Receivings menu or Receivings edit list from the Reports menu.
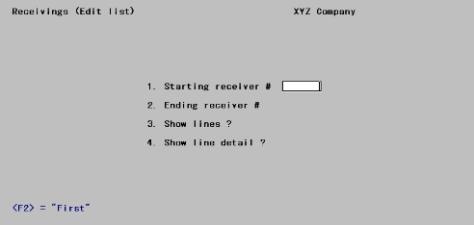
Enter the following information:
1. Starting receiver # and
2. Ending receiver #
Enter the range of receivers to show on the edit list. Follow the screen instructions.
|
Format |
999999 at each field |
|
Example |
Press <F2> at both fields. |
3. Show lines ?
Answer Y to show both header and line information, or N to show only the header information.
|
Format |
One letter, either Y or N. The default is N. |
|
Example |
Type:Y |
4. Show line detail ?
If you answered N to Field #3, this field displays as Not applicable and may not be entered.
Answer Y to show the detail of each receiver line, or N to show just a single print line per receiver line.
|
Format |
One letter, either Y or N. The default is N. |
|
Example |
Type:Y |
Field number to change ?
Make any needed changes. Upon pressing <Enter> with this field blank, the Receivings Edit List prints.
If there is a gap (unused numbers) in the receiver number sequence, an error message prints on the edit list. Posting cannot take place. You can fix this situation by either entering the missing receivers or voiding the missing receiver number through the Enter option under Receivings.
This selection allows you to post all or only a portion of the receivers. A Receivings Register is printed.
See a sample Receivings Register in the Sample Reports appendix.
Select
Post from the Receivings menu.
Please enter ending receiver # to post
You are asked to enter the ending receiver number to post. Enter the appropriate number or press <F2> to use Last.
|
Format |
999999 |
|
Example |
Press <F2> |
Print item labels ?
If Inventory Control is not being used, this field will display as (Not applicable).
Enter Y to print item labels using the I/C format or N to not print labels.
Any change ?
Answer N if there is no change, or Y to make the appropriate change.
If you select Y, the receivings are posted and the Receivings Register is printed.
Purchase orders are updated at this time with the quantity of goods received. A history record is also created for each receiving line.
If I/C is interfaced, the inventory information for these receivings is updated.
When posting is complete, a message displays to inform you either that the posting was successful or that there were errors which prevented posting. Press <Esc> to return to the menu. If any receiving is prevented from posting, none of the others are posted, but the Receivings Register is printed and contains diagnostics which helps you correct the errors. On of the messages could indicate that there are missing receiver numbers. In this case you must use <F2> from the P.O. # field on the Receivings Enter screen to void each receiver number.